|
Main Scene File
Download the Max9  support scene here : Max9 (SP1) file 77kb Zip (Max 8 basic setup to follow) support scene here : Max9 (SP1) file 77kb Zip (Max 8 basic setup to follow)
The copyright © for the Schnorbill object is retained by DMMultimedia - License is granted to use and modify this object in a personal basis for the sake of following the tutorial. By downloading the file you agree to these conditions and will use this file SOLELY and EXCLUSIVELY for following the tutorial. The Schnorbill object cannot be used, distributed or sold in any other way without prior written consent.
This file contains some basic object and settings:
- The Schnorbill object
- The lighting setup - Omnis and Skylight
- Layers for future objects and setup (discussed below)
Basic setup
Schorbill object
The max9 file includes the Schnorbill and other basic objects. The Schnorbill object is by default setup with symmetry and turbosmooth switched off.
Logarithmic Lighting
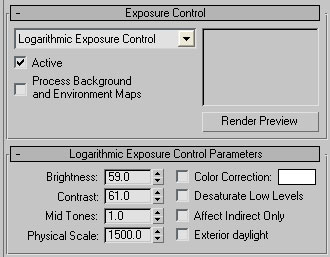 The lighting is setup to use Logarithmic exposure. It is not essential to use Log exposure but I was experimenting with settings for controlling the extreme levels of light and dark, and kept them. The Log settings are found in the Rendering -> Environment -> Environment and Rendering panel. The settings are shown on the left. The lighting is setup to use Logarithmic exposure. It is not essential to use Log exposure but I was experimenting with settings for controlling the extreme levels of light and dark, and kept them. The Log settings are found in the Rendering -> Environment -> Environment and Rendering panel. The settings are shown on the left.
These are the initial settings that we will adjust slightly later when we start adding environment maps and textures.
Layers
There are several layers included with the Max9 file. Layers are a very convenient way to order objects so that we can hide layers of objects to free up our workspace and speed up viewport performance.
Most of these are empty at the moment but we will build up the contents and I will make available Max files that will have additional objects that are already in these empty layers. The layers can be viewed by using this button :
 Layers Button on main toolbar Layers Button on main toolbar
This will show the scenes layers :
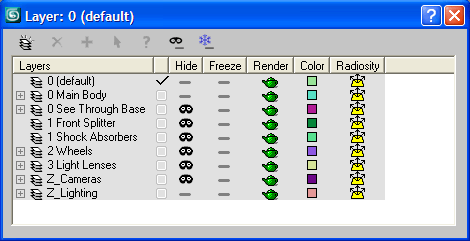
The layers contained in the Schnorbill scene
At present most of these layers are empty, we will have to create the Front Splitter, Shock Absorbers and Wheels. Further objects will be available to download later for these layers.
Textures
There are a couple of predefined textures to get us started, a gradient ramp for the skylight, a Flat red Paint tester and the eye texture. The bitmap for the eye should be included in your default max map folders.
Quick Render
 OK, before we roll up our sleeves and start texturing lets see something now. Load the file as supplied, open the layers panel and unhide the 0 See Through Base layer (by clicking on the icon in the Hide column). OK, before we roll up our sleeves and start texturing lets see something now. Load the file as supplied, open the layers panel and unhide the 0 See Through Base layer (by clicking on the icon in the Hide column).
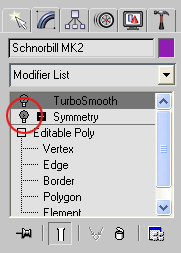
Now select the Schnorbill object and go to the Modify Panel. There you can see a Symmetry modifier and a Turbosmooth modifier. Switch these both on by clicking on the little light bulb object (as shown highlighted in the image.
We should now have a smoothed full bodied Schnorbill hovering above a flat ground plane.
 Hit the render button - The render settings are setup for Draft with low settings for Anti-aliasing which is good for a quick render. Hit the render button - The render settings are setup for Draft with low settings for Anti-aliasing which is good for a quick render.
We should get the image shown below. This is not very interesting and it is to this basic scene that we will start to add textures. The next section will start the texturing process by focusing on some methods for creating Paint textures.
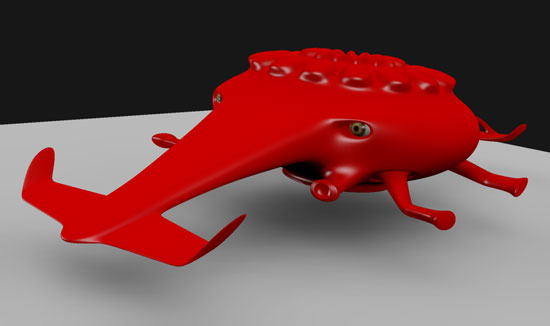
Default Output from Schnorbill scene
|
This Tutorial is copyright © www.dmmultimedia.com
and must not be reproduced in ANY form without prior written consent. |
|
|
 DM
Multimedia Ltd
DM
Multimedia Ltd